Embark on a scientific expedition with our comprehensive glacier simulation activity answer key. This guide unveils the intricate world of glaciers, their formation, movement, and behavior. Prepare to delve into the icy depths of glacial science and uncover the secrets of these majestic natural wonders.
Through hands-on simulations, data analysis, and thought-provoking discussions, this activity key empowers educators and students to explore the fascinating realm of glaciers. Understand the processes that shape these icy behemoths and their profound impact on our planet’s ecosystems.
Glacier Simulation Activity Overview
The glacier simulation activity is designed to provide participants with a hands-on experience of glacier formation and movement. The activity aims to demonstrate the processes involved in glacier formation, including snow accumulation, compaction, and recrystallization. Participants will also explore the different types of glacier movement, such as basal sliding and ice flow.
The materials required for the activity include:
- A large, flat surface (such as a table or the floor)
- White sand or flour
- A sieve
- A spoon or spatula
- A ruler or measuring tape
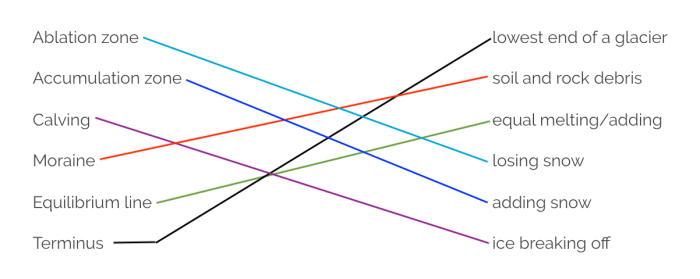
Glacier Formation and Movement
Glaciers are formed when snow accumulates and compacts over time. As the snow accumulates, it becomes denser and heavier. This weight causes the snow to recrystallize into ice. The ice crystals then interlock with each other, forming a solid mass.
Glaciers move by two main mechanisms: basal sliding and ice flow. Basal sliding occurs when the glacier slides over the underlying bedrock. Ice flow occurs when the glacier deforms under its own weight. The rate of glacier movement is determined by a number of factors, including the slope of the glacier, the thickness of the glacier, and the temperature of the ice.
Simulation Procedures
To conduct the glacier simulation activity, follow these steps:
- Spread a thin layer of sand or flour on the flat surface.
- Use the sieve to sprinkle a layer of snow (represented by sand or flour) over the surface.
- Use the spoon or spatula to compact the snow.
- Repeat steps 2 and 3 until the glacier is the desired thickness.
- Use the ruler or measuring tape to measure the length, width, and thickness of the glacier.
- Tilt the flat surface to simulate the slope of a glacier.
- Observe the glacier as it moves.
Data Collection and Analysis
During the simulation activity, participants can collect data on the following:
- The length, width, and thickness of the glacier
- The rate of glacier movement
- The temperature of the ice
This data can be used to analyze the behavior of glaciers and to draw conclusions about how glaciers form and move.
Discussion and Applications: Glacier Simulation Activity Answer Key
After the simulation activity, participants can discuss the results of the experiment. They can discuss the implications of the findings for understanding real-world glaciers. They can also explore potential applications of the simulation activity in educational settings or scientific research.
Common Queries
What is the purpose of the glacier simulation activity?
The glacier simulation activity aims to provide a hands-on and engaging learning experience that helps participants understand the processes of glacier formation, movement, and behavior.
What materials are required for the glacier simulation activity?
The materials required for the glacier simulation activity typically include ice cubes, salt, sand, a container, and a ruler or measuring tape.
How can the data collected from the glacier simulation activity be used?
The data collected from the glacier simulation activity can be used to analyze the effects of different variables on glacier behavior, such as temperature, slope, and surface roughness.